Annotation Tools
In this tutorial, you will learn how to use annotation tools to annotate.
Preface
In order to render a volume we need:
- Initialize cornerstone and related libraries.
- HTMLDivElements to render different orientation of the volume (e.g., one for Axial, one for Sagittal)
- The path to the images (
imageIds).
Implementation
Initialize cornerstone and related libraries
import { init as coreInit } from '@cornerstonejs/core';
import { init as dicomImageLoaderInit } from '@cornerstonejs/dicom-image-loader';
import { init as cornerstoneToolsInit } from '@cornerstonejs/tools';

await coreInit();
await dicomImageLoaderInit();
await cornerstoneToolsInit();
We have already stored images on a server for the purpose of this tutorial.
First let's create two HTMLDivElements and style them to contain viewports.
const content = document.getElementById('content');

// element for axial view
const element1 = document.createElement('div');
element1.style.width = '500px';
element1.style.height = '500px';

// element for sagittal view
const element2 = document.createElement('div');
element2.style.width = '500px';
element2.style.height = '500px';

content.appendChild(element1);
content.appendChild(element2);
Next, we need a renderingEngine
const renderingEngineId = 'myRenderingEngine';
const renderingEngine = new RenderingEngine(renderingEngineId);
Loading a volume is possible by using the volumeLoader API.
// Define a volume in memory
const volume = await volumeLoader.createAndCacheVolume(volumeId, { imageIds });
We can then create a viewports inside the renderingEngine by using the setViewports API.
const viewportId1 = 'CT_AXIAL';
const viewportId2 = 'CT_SAGITTAL';

const viewportInput = [
  {
    viewportId: viewportId1,
    element: element1,
    type: ViewportType.ORTHOGRAPHIC,
    defaultOptions: {
      orientation: Enums.OrientationAxis.AXIAL,
    },
  },
  {
    viewportId: viewportId2,
    element: element2,
    type: ViewportType.ORTHOGRAPHIC,
    defaultOptions: {
      orientation: Enums.OrientationAxis.SAGITTAL,
    },
  },
];

renderingEngine.setViewports(viewportInput);

await volume.load();
In order for us to use tools, add them inside Cornerstone3DTools internal state via the addTool API.
addTool(BidirectionalTool);
Next, create a ToolGroup and add the tools we want to use. ToolGroups makes it possible to share tools between multiple viewports, so we also need to let the ToolGroup know which viewports it should act on.
const toolGroupId = 'myToolGroup';
const toolGroup = ToolGroupManager.createToolGroup(toolGroupId);

// Add tools to the ToolGroup
toolGroup.addTool(BidirectionalTool.toolName);

toolGroup.addViewport(viewportId1, renderingEngineId);
toolGroup.addViewport(viewportId2, renderingEngineId);
Why do we add renderingEngineUID to the ToolGroup? Because viewportId is unique within each renderingEngine.
Next, set the Tool to be active, which means we also need to define a bindings for the tool (which mouse button makes it active).
// Set the
toolGroup.setToolActive(BidirectionalTool.toolName, {
  bindings: [
    {
      mouseButton: csToolsEnums.MouseBindings.Primary, // Left Click
    },
  ],
});
Let's load the volume and set the viewports to render the volume.
setVolumesForViewports(
  renderingEngine,
  [
    {
      volumeId,
      callback: ({ volumeActor }) => {
        // set the windowLevel after the volumeActor is created
        volumeActor
          .getProperty()
          .getRGBTransferFunction(0)
          .setMappingRange(-180, 220);
      },
    },
  ],
  [viewportId1, viewportId2]
);

// Render the image
renderingEngine.renderViewports([viewportId1, viewportId2]);
Final code
Final Code
import {
  init as coreInit,
  RenderingEngine,
  Enums,
  volumeLoader,
  setVolumesForViewports,
} from '@cornerstonejs/core';
import { init as dicomImageLoaderInit } from '@cornerstonejs/dicom-image-loader';
import {
  init as cornerstoneToolsInit,
  ToolGroupManager,
  WindowLevelTool,
  ZoomTool,
  Enums as csToolsEnums,
  addTool,
  BidirectionalTool,
} from '@cornerstonejs/tools';
import { createImageIdsAndCacheMetaData } from '../../../../utils/demo/helpers';

const { ViewportType } = Enums;

const content = document.getElementById('content');

// element for axial view
const element1 = document.createElement('div');
element1.style.width = '500px';
element1.style.height = '500px';

// element for sagittal view
const element2 = document.createElement('div');
element2.style.width = '500px';
element2.style.height = '500px';

content.appendChild(element1);
content.appendChild(element2);
// ============================= //

/**
 * Runs the demo
 */
async function run() {
  await coreInit();
  await dicomImageLoaderInit();
  await cornerstoneToolsInit();

  const imageIds = await createImageIdsAndCacheMetaData({
    StudyInstanceUID:
      '1.3.6.1.4.1.14519.5.2.1.7009.2403.334240657131972136850343327463',
    SeriesInstanceUID:
      '1.3.6.1.4.1.14519.5.2.1.7009.2403.226151125820845824875394858561',
    wadoRsRoot: 'https://d14fa38qiwhyfd.cloudfront.net/dicomweb',
  });

  // Instantiate a rendering engine
  const renderingEngineId = 'myRenderingEngine';
  const volumeId = 'myVolume';
  const renderingEngine = new RenderingEngine(renderingEngineId);
  const volume = await volumeLoader.createAndCacheVolume(volumeId, {
    imageIds,
  });
  const viewportId1 = 'CT_AXIAL';
  const viewportId2 = 'CT_SAGITTAL';

  const viewportInput = [
    {
      viewportId: viewportId1,
      element: element1,
      type: ViewportType.ORTHOGRAPHIC,
      defaultOptions: {
        orientation: Enums.OrientationAxis.AXIAL,
      },
    },
    {
      viewportId: viewportId2,
      element: element2,
      type: ViewportType.ORTHOGRAPHIC,
      defaultOptions: {
        orientation: Enums.OrientationAxis.SAGITTAL,
      },
    },
  ];

  renderingEngine.setViewports(viewportInput);

  await volume.load();

  addTool(BidirectionalTool);

  const toolGroupId = 'myToolGroup';
  const toolGroup = ToolGroupManager.createToolGroup(toolGroupId);

  // Add tools to the ToolGroup
  toolGroup.addTool(BidirectionalTool.toolName);

  toolGroup.addViewport(viewportId1, renderingEngineId);
  toolGroup.addViewport(viewportId2, renderingEngineId);

  toolGroup.setToolActive(BidirectionalTool.toolName, {
    bindings: [
      {
        mouseButton: csToolsEnums.MouseBindings.Primary, // Left Click
      },
    ],
  });

  setVolumesForViewports(
    renderingEngine,
    [
      {
        volumeId,
        callback: ({ volumeActor }) => {
          // set the windowLevel after the volumeActor is created
          volumeActor
            .getProperty()
            .getRGBTransferFunction(0)
            .setMappingRange(-180, 220);
        },
      },
    ],
    [viewportId1, viewportId2]
  );

  // Render the image
  renderingEngine.renderViewports([viewportId1, viewportId2]);
}

run();
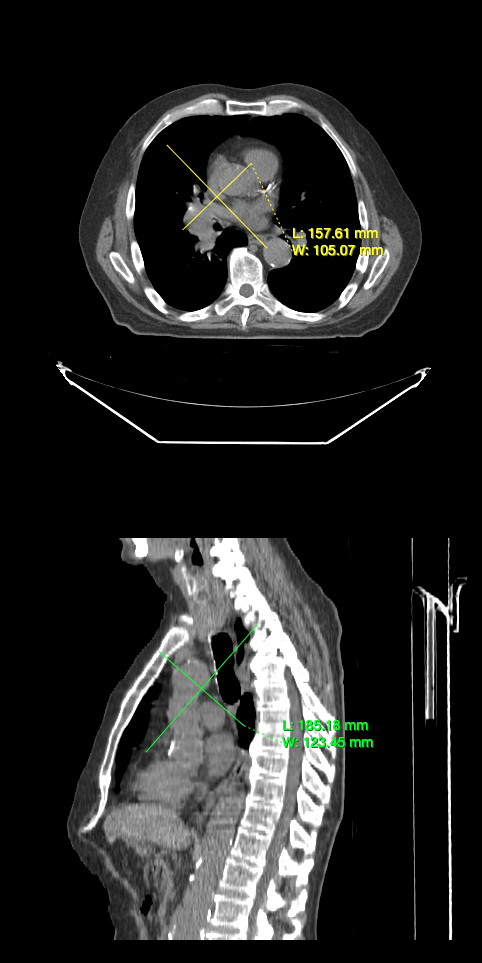
You should be able to annotate images with the tools you added.
Read more
Learn more about:
For advanced usage of Annotation tools, please visit Volume Annotation Tools example page.