Viewports
A viewport can be thought of as:
- A camera viewing an image from a specific perspective.
- A canvas to display the output of this camera.
- A set of transforms from the image data to viewable data (LUT, Window Level, Pan etc)
In Cornerstone3D viewports are created from HTML elements, and the consumer should
pass the element for which the viewport should be created. For example, a CT series can be
viewed via 4 viewports in a “4-up” view: Axial MPR, Sagittal MPR, Coronal MPR, A 3D perspective volume render.
See Viewport Reference and Presentation for more details on the reference and presentation details that select which image and how that image is presented.
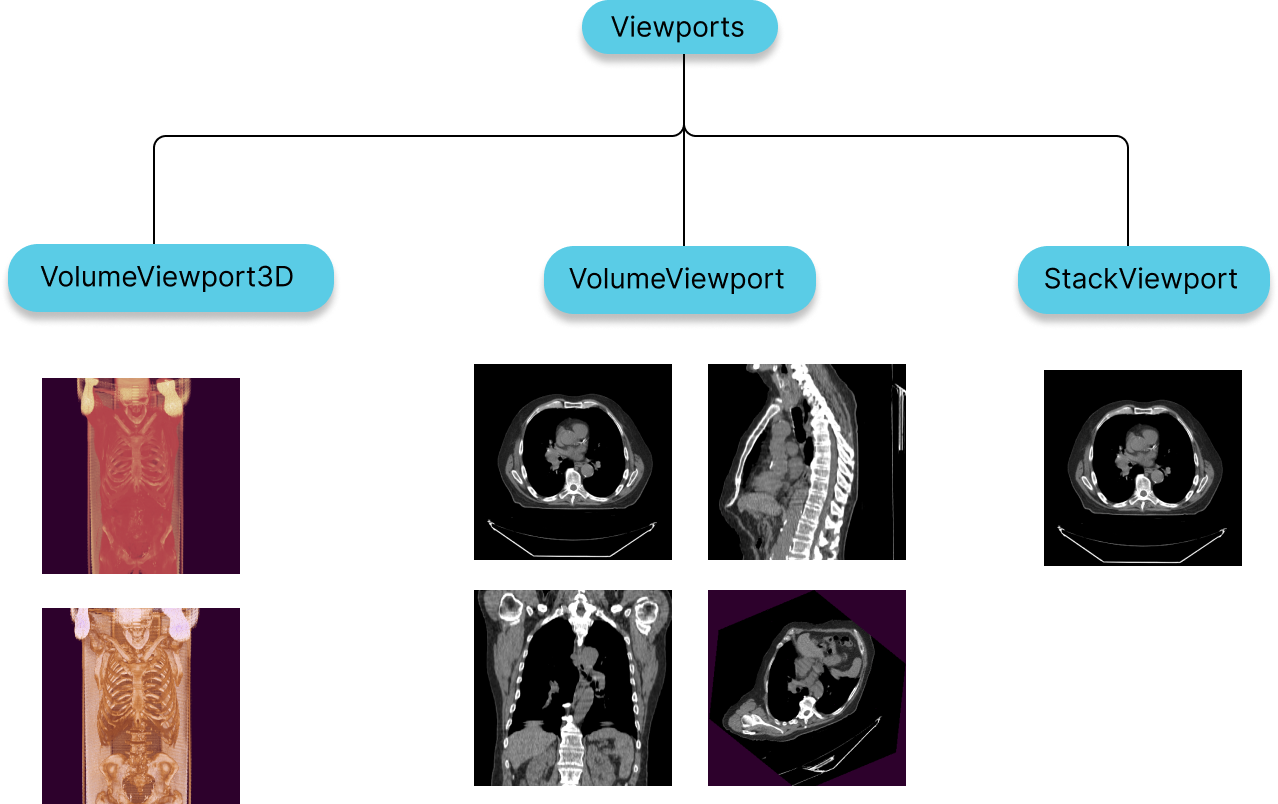
StackViewport
- Suitable for rendering a stack of images, that might or might not belong to the same image.
- Stack can include 2D images of various shapes, size and direction
VolumeViewport
- Suitable for rendering a volumetric data which is considered as one 3D image.
- Having a VolumeViewport enables Multi-planar reformation or reconstruction (MPR) by design, in which you can visualize the volume from various different orientations without addition of performance costs.
- For having image fusion between two series
3D Viewport
- Sutiable for actual 3D rendering of a volumetric data.
- For having different types of presets such as Bone, Soft Tissue, Lung, etc.
Both StackViewport and VolumeViewport, VolumeViewport3D are created via the RenderingEngine API.
VideoViewport
- Suitable for rendering video data
- Video can include MPEG 4 encoded vide streams. In theory, MPEG2 is also supported, but practically the browser doesn't support that.
Whole Slide Image Viewport
- Suitable for rendering whole slide images
Initial Display Area
All viewports inherit from the Viewport class which has a displayArea field which can be provided.
This field can be used to programmatically set the initial zoom/pan on an image. By default, the viewport
will fit the dicom image to the screen. The displayArea takes a DisplayArea type which has the following
fields.
type DisplayArea = {
  imageArea: [number, number], // areaX, areaY
  imageCanvasPoint: {
    imagePoint: [number, number], // imageX, imageY
    canvasPoint: [number, number], // canvasX, canvasY
  },
  storeAsInitialCamera: boolean,
};
Zoom and pan are all relative to the initial "fit to screen" view.
In order to zoom into the image 200%, we would set the imageArea to [0.5, 0.5].
Panning is controlled by a provided imagePoint and a provided canvasPoint. You can imagine the canvas as a sheet of white paper and the image as another sheet of paper like a chest x-ray. Mark a point in the canvas paper with a pen and then mark another point on your chest x-ray image. Now try to "pan" your image so the point so the imagePoint matches the
canvasPoint. This is what the API design of imageCanvasPoint represents.
Thus if you wanted to left align you image, you could provide the following value:
imageCanvasPoint: {
  imagePoint: [0, 0.5], // imageX, imageY
  canvasPoint: [0, 0.5], // canvasX, canvasY
};
This means the left (0) middle (0.5) point on the canvas needs to align with the left (0) middle (0.5) point on the image. Values are based on % size of the full image. In this example, if we had a 1024 x 1024 x-ray image. The imagePoint would be [0, 512]. Let's say we were on a mobile iPhone in landscape mode (844 x 390). The canvasPoint would be [0, 195].